Import or copy the Auto-Complete List to another computer
Outlook for Microsoft 365 Outlook 2021 Outlook 2019 Outlook 2016 Outlook 2013 More…
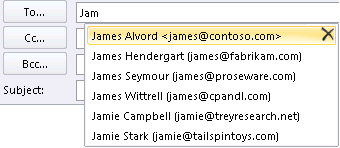
The Auto-Complete List is a feature that displays suggestions for names and email addresses as you begin to type them. These suggestions are possible matches from a list of names and email addresses from the email messages that you have sent.
The method to copy your AutoComplete list from one computer to another depends on what type of email account you’ve added to Outlook. If you have a Microsoft 365 account, Exchange Server account, or an IMAP account (this is the most common type of other email account), then the AutoComplete list is stored as a hidden file in your Outlook Data File. See Copy the AutoComplete list for instructions.
If you have a POP3 account (less common, but often used for third-party email providers like Comcast, Earthlink, and Verizon), your AutoComplete list is stored in a file stored on your computer. See Copy and import an .nk2 file.
If you don’t know what type of account you have, select File > Account Settings > Account Settings. You can find your account type here.
Copy the AutoComplete list
Step 1: Export the AutoComplete mailbox message
- Exit Outlook, and then close Outlook Web Access or Outlook Web App (OWA) on all workstations that are connected to your mailbox.
- Download and install MFCMAPI from http://mfcmapi.codeplex.com.
- Run mfcmapi.exe.
- On the Session menu, click Logon.
- If you are prompted for a profile, select the desired profile name, and then click OK.
- In the top pane, locate the line that corresponds to your mailbox, and then double-click it.
- In the left-side navigation pane, expand Root Container, and then expand Top of Information Store or IPM_SUBTREE.
- Right-click the Inbox folder, and then click Open Associated Content Table. This action opens a new MFCMAPI window that contains various properties.
- Under the Subject column, right-click the item that has the subject IPM.Configuration.Autocomplete, and then click Export Message. This action opens the Save Message To File window.
- In the drop-down list, select MSG file (UNICODE), and then click OK.
- Select a folder location to which you want to save the message, and then click Save. Note this location.
Step 2: Import the AutoComplete mailbox message
- Exit Outlook, and then close Outlook Web Access or Outlook Web App (OWA) on all workstations that are connected to your mailbox.
- Download and install MFCMAPI from http://mfcmapi.codeplex.com.
- Run mfcmapi.exe.
- On the Session menu, click Logon.
- If you are prompted for a profile, select the desired profile name, and then click OK.
- In the top pane, locate the line that corresponds to your mailbox, and then double-click it.
- In the left-side navigation pane, expand Root Container, and then expand Top of Information Store or IPM_SUBTREE.
- Right-click the Inbox folder, and then click Open Associated Content Table. This action opens a new MFCMAPI window that contains various properties.
- To avoid duplicate entries, you must delete the existing AutoComplete message.Note: Before you delete the IPM.Configuration.Autocomplete message, you must export the message by using the steps in the “How to export the Auto-Complete cache” section.To delete the existing AutoComplete message, follow these steps:
- In the Subject column, locate the item that has the subject IPM.Configuration.Autocomplete.
- Right-click the item, and then click Delete message. This opens the Delete Item window.
- In the drop-down list, select Permanent deletion (deletes to deleted item retention if supported), and then click OK.
- On the Folder menu, click Import, and then click From MSG.
- Locate the .msg file that you created in step 11 of the “Export the AutoComplete mailbox message” above, and then click OK.
- In the Load MSG window that appears, select Load message into current folder in the Load style list, and then click OK.
The AutoComplete information is imported from the IPM.Configuration.Autocomplete_<hexadecimal code>.msg, where the placeholder<hexadecimal code> represents a long string of numbers and letters.
Copy and import an .nk2 file
Step 1: Copy the Auto-Complete file from the old computer
- Because the default folder is hidden folder, the easiest way to open the folder is to use the command %APPDATA%\Microsoft\Outlook in the Windows Search box (or, browse to C:\Users\username\AppData\Roaming\Microsoft\Outlook).
- In the Outlook folder, find your Auto-Complete List (.nk2) file.Note: By default, file extensions are hidden in Windows. To change whether file extensions are shown, in Window Explorer on the Tools menu (in Windows 7 or Windows Vista, press the ALT key to see the Tools menu), click Folder Options. On the View tab select or clear the Hide extensions for known file types check box.
- Copy the file to the new computer. The file is small and can be placed on a removable media such as a USB memory stick.
Step 2: Copy the Auto-Complete file to the new computer
- On the new computer, in Control Panel, click or double-click Mail.Mail appears in different Control Panel locations depending on the version of the Microsoft Windows operating system, the Control Panel view selected, and whether a 32- or 64-bit operating system or version of Outlook 2010 is installed.The easiest way to locate Mail is to open Control Panel in Windows, and then in the Search box at the top of window, type Mail. In Control Panel for Windows XP, type Mail in the Address box.Note: The Mail icon appears after Outlook starts for the first time.
- Click Show Profiles.
- Make a note of the name of the profile. You will need to change the .nk2 file name to match the name later.
- Copy the .nk2 file to the new computer in the folder in which Outlook configurations are saved. Because the default folder is hidden folder, the easiest way to open the folder is to use the command %APPDATA%\Microsoft\Outlook in the Windows Search box (or, browse to C:\Users\username\AppData\Roaming\Microsoft\Outlook).
- After the file is copied to the folder, right-click the file, click Rename, and change the name to match the profile name that appeared in step 3.
Step 3: Import the Auto-Complete List
You are now ready to start Outlook and import the file, but you must start Outlook with a special one-time command.
- Type outlook /importnk2 in the Windows Search box and then press Enter.
The Auto-Complete List should now have the entries from your other computer when you compose a message and begin typing in the To, Cc, or Bcc boxes.